 The "network mapper" or Nmap utility is one of the most famous and practical security tools available, with a rich history and helpful documentation. Nmap is an open-source network exploration tool that expedites auditing and scanning to allow users to better understand the network around them.
Nmap runs from a host system and conducts carefully controlled scans of target hosts, subnets and networks. It gathers information like IP addresses, port status, operating systems and more. It's scriptable, so you can integrate it into DevSecOps pipelines as part of an automated routine for confirming configurations. The Nmap community has even created a scripting engine with hundreds of focused scripts available for free download. And speaking of free, Nmap is open-source, so you can trust its reliability, version history and free-of-cost status.
This article covers basic Nmap functionality and port scans based on specific use cases. It provides examples using the command-line version and the Zenmap graphical front-end.
Nmap in Cybersecurity
Nmap is usually thought of as a cybersecurity tool, though its usefulness as a troubleshooting utility should not be underrated. Security pros and administrators use Nmap for many different types of tasks.
Consider the following examples:
- Want to inventory your network? Conduct an Nmap scan to identify nodes and operating systems.
- Need to conduct a vulnerability scan? Run Nmap to identify unexpected ports or systems.
- Been asked to identify network services at various hosts? Nmap lists services hosts expose to the network.
- Concerned about firewall settings? Use Nmap to scan for firewall configurations.
- Need to validate router configurations? An Nmap scan helps identify and show router availability.
Note that not all of these are traditional security or vulnerability scans. Several are more related to exploring, understanding and troubleshooting the network environment from the perspective of network and system administrators.
Install Nmap
Nmap is truly a cross-platform utility with simple installers for Linux, macOS and Windows. Since Nmap is open-source, the source code is readily available if you prefer to compile it yourself. The following sections briefly review all four installation options.
Linux Installation
The Nmap team has pre-assembled the application into ready-to-install RPM packages for Red Hat-based distributions. Use the rpm, yum or dnf commands to install the program after downloading the RPM.
For example, if you've downloaded Nmap version 7.94 to your Fedora workstation, type the following command into the Terminal:
# dnf install ~/Downloads/nmap-7.94-1.x86_64.rpm
The package manager unpacks and installs Nmap, making it ready to use.
MacOS Installation
MacOS users can download the Nmap disk image and then double-click it to begin the installation process. Follow the instructions to install the application. The Apple Gatekeeper feature may prompt for confirmation and your password before installing Nmap.
Windows Installation
Windows users will download a setup executable that installs Nmap on the system. Nmap is installed in the C:\Program Files folder by default. You'll execute Nmap from the Terminal or Windows PowerShell command-line interface.
Compile Nmap Yourself
You may choose to compile Nmap on your system after reviewing the source code (as is your right with open-source applications). The Nmap documentation describes this as the "traditional compile-it-yourself format." The steps are described online in case you're new to compiling software on Linux systems.
Here are the commands:
$ bzip2 -cd nmap-7.94.tar.bz2 | tar xvf -
$ cd nmap-7.94
$ ./configure
$ make
$ su root
$ make install
Nmap works fine in virtualized environments, so consider installing it in your VM-based lab before running it on production networks.
What Is Zenmap?
Command-line scans are common with Nmap, but many administrators will prefer using a graphical interface. Indeed, there are advantages to the results generated in the graphical version of Nmap (named Zenmap). For example, network maps give a visual representation of the relationship between systems. Zenmap is usually included with the installation methods above, so you may be able to double-click an icon rather than run your scan from the command line.
Figure 1: The Zenmap icon
Details on using the Zenmap graphical interface are below.
Other Utilities
Some Nmap features rely on additional programs, including Ncat, Nping, Ndiff and npcap. This article does not examine these in detail but be aware that they may be installed alongside Nmap to ensure functionality or enable advanced features.
Get Started With Nmap
Nmap is a powerful program that combines many options for specific scans. There are so many option combinations that it's often overwhelming. The best way to begin with Nmap is to conduct a few basic scans targeting specific information.
There is one more critical step to take before launching Nmap. You must be certain you have authorization to use network scanners in your company environment. Malicious actors do use tools like Nmap to footprint networks, and these tools are often detectable by intrusion detection/prevention systems. Do not run Nmap without authorization!
Example 1: Basic scan of one host
Begin by focusing Nmap on a single host. It's best to identify hosts by IP address to avoid any name resolution issues (remember, you may be using Nmap to troubleshoot, so DNS could be a culprit). Use the standard nmap command with no options plus an IP address.
$ nmap 10.1.0.2
The scan returns information on the 10.1.0.2 host.
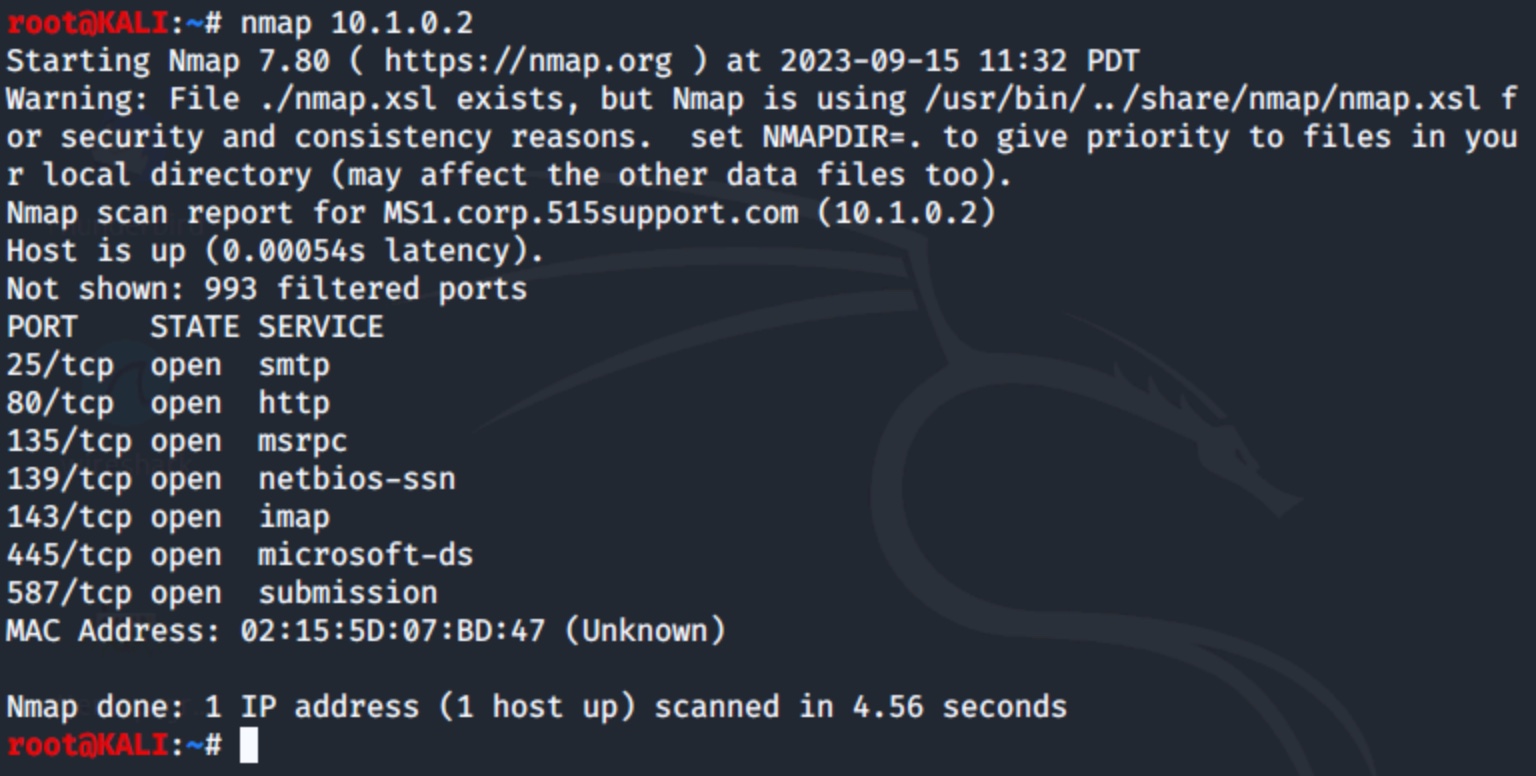
Figure 2: A basic scan of the 10.1.0.2 host
The above results list a series of open ports and the related service. Notice ports 25, 80, 135 and 139. This system is probably a Windows computer (ports 135 and 139) hosting email services (port 25) and web services (port 80).
Example 2: Basic subnet inventory
If your security audit or troubleshooting opportunity spans a network segment, replace the IP address with the network ID, as in the following example:
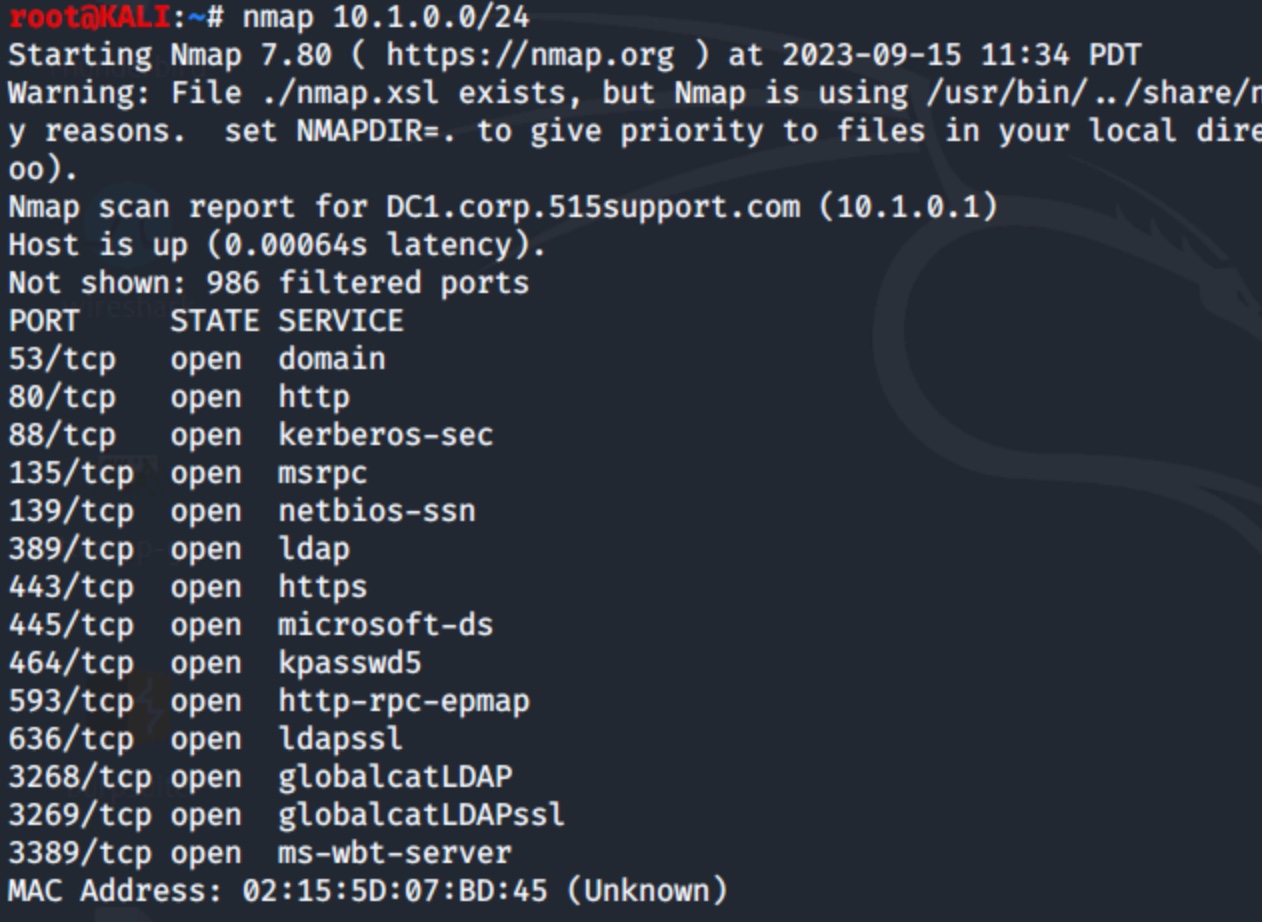
Figure 3: Scan of the 10.1.0.0/24 subnet with results from one of many hosts
There will be a lot of output if there are many hosts on the segment. The above screenshot only displays results for one of the detected hosts.
Results will vary depending on the scan type, but in general, Nmap reports on a per-system basis, showing whether the target is up, what ports were scanned, what ports were open, the MAC address and a summary of the scan.
Be aware that network discovery scans can take significant time depending on the scan options and number of hosts. It's best to start small.
The most common Nmap scan is a TCP SYN (Stealth) scan, which uses the -sS option. It initiates but never completes TCP-based connections. This fact makes it difficult for intrusion software to detect. It's also quick and works with any host that accepts TCP connections. When running Nmap with root or administrator privileges, you probably won't need to specify -sS, as it is assumed when these privileges are available.
The -sT flag is another option if SYN scans are not available. This usually occurs when you don't have (and can't get) admin privileges on the machine.
Example 3: Scan with OS detection
One particularly useful option is asking Nmap to guess the target operating system. Specific operating systems have unique quirks that Nmap can pick up. For example, Windows file sharing usually occurs over ports 137, 138, 139 and 445. If any of those ports are open, it's a good bet you're looking at a Windows system. Nmap's OS analysis goes much deeper than just port numbers, however.
To add OS identification to a scan of 10.1.0.2, use the -A option:
$ nmap -A 10.1.0.2

Figure 4: Operating system identification details for the target system
Note that the above screenshot shows a partial result related only to the OS identification results.
Example 4: Scanning for ports
Maybe your security audit calls for identifying all systems available via the default SSH port (22/tcp). Focus Nmap's attention on this single port by using the -p option, as seen below:
$ nmap -p 22 10.1.0.0/24
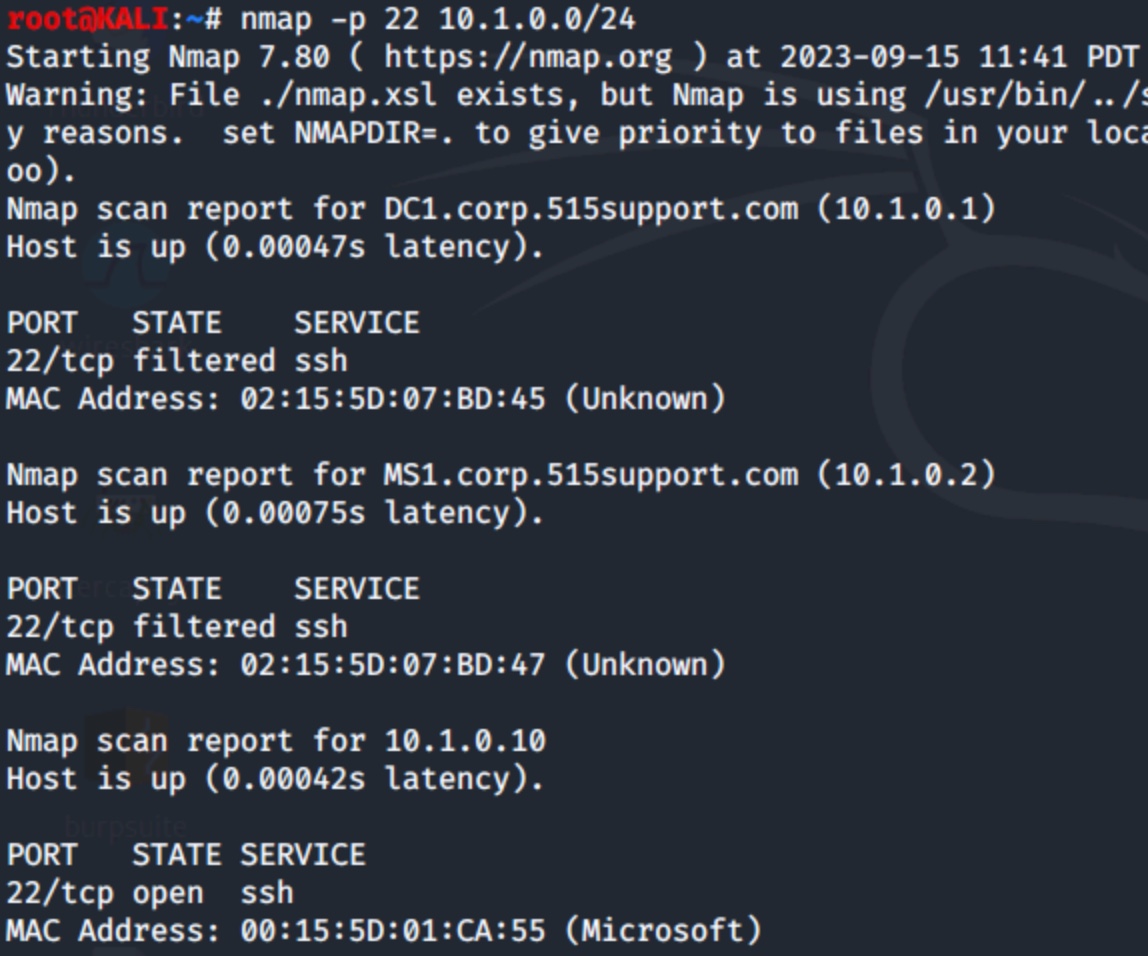
Figure 5: Scanning for port 22 (SSH) with multiple hosts responding
What if you're looking for all web (HTTP and HTTPS) and FTP servers? Separate the port numbers by commas, like this:
$ nmap -p 21,80,443 10.1.0.0/24
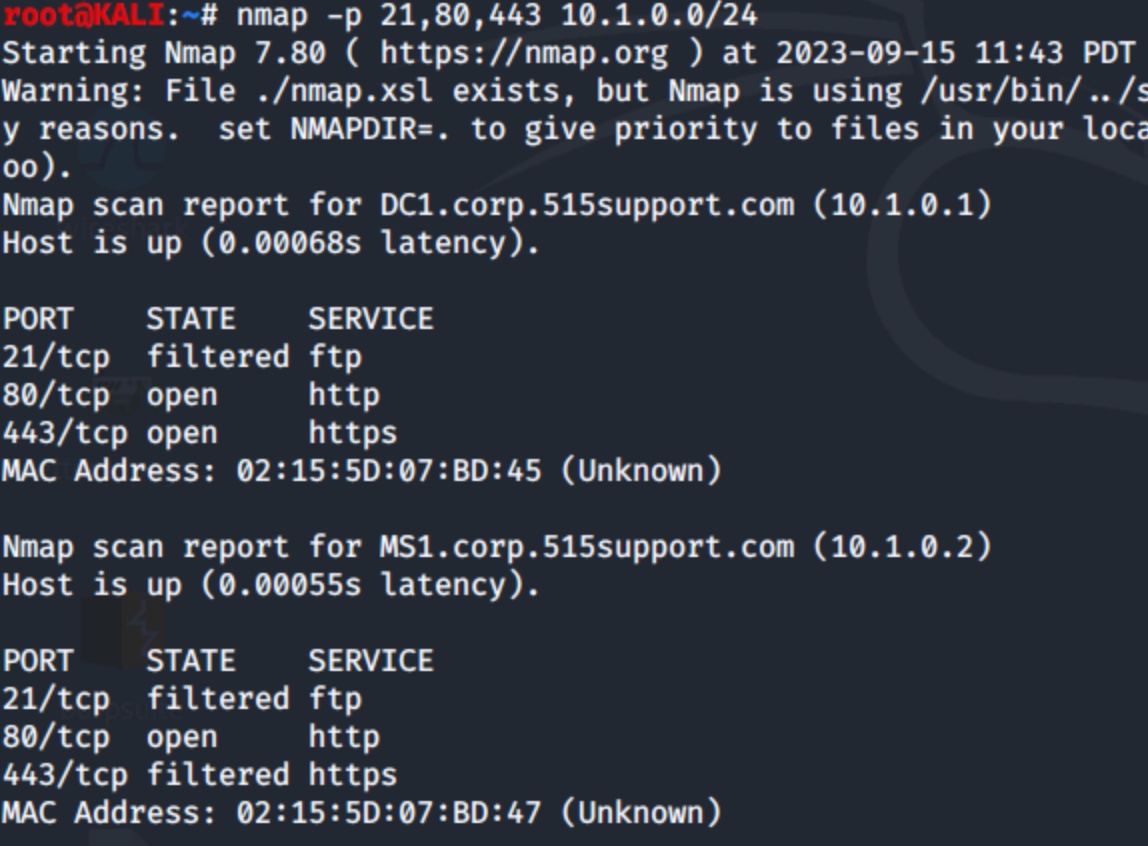
Figure 6: Scan for multiple ports with two hosts responding
A final trick is to scan for the most common ports. Recall that there are 65,535 possible ports. Scanning each of these on a big subnet would be very time-consuming. Add the --top-ports 1000 option to poll the most common ports:
$ nmap --top-ports 1000 10.1.0.0/24
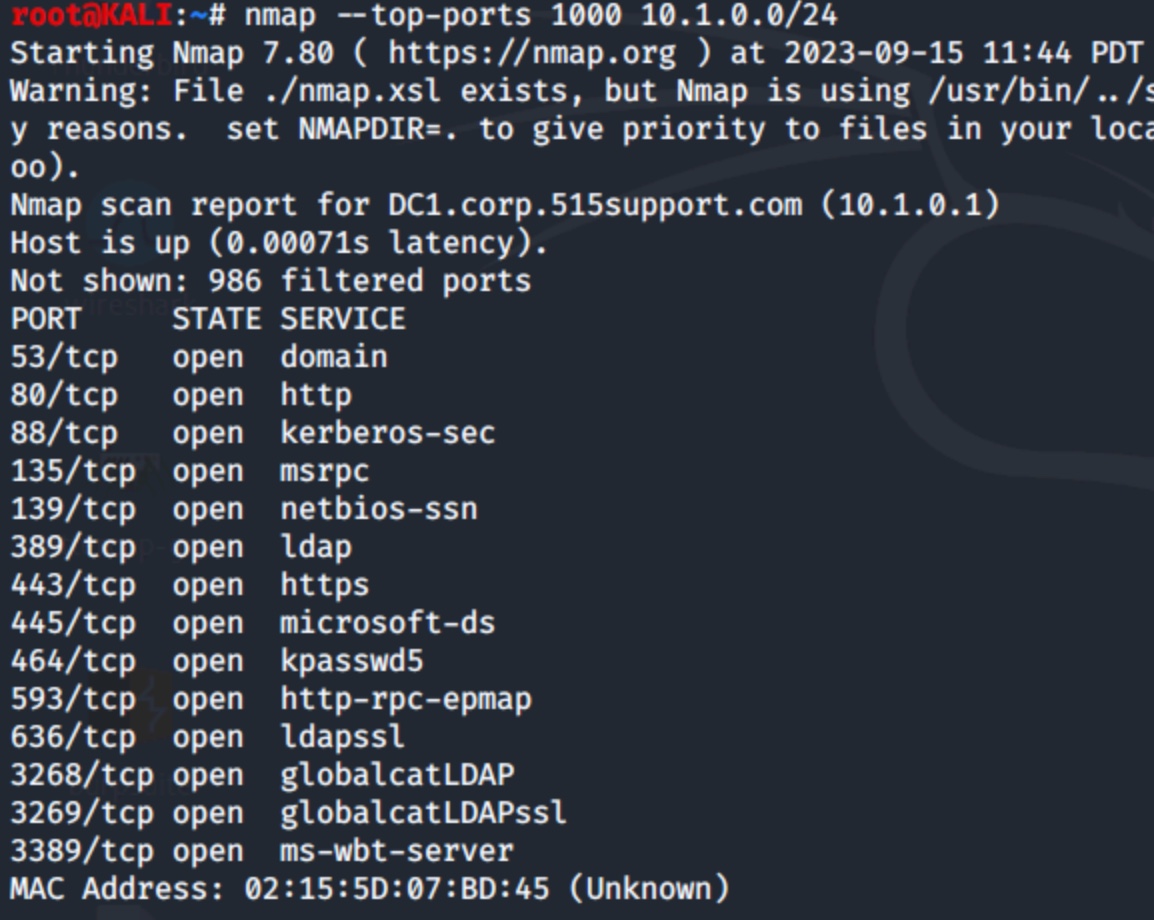
Figure 7: Scan for the 1000 most common TCP ports
Increase the verbosity (detail) of the results by using the -v or -vv options. Be aware that doing so could increase the scan time, however.
Option | Description |
-sS | SYN stealth scan, a common choice |
-sT | TCP Connect scan, common when -sS isn't available |
-T4 | Timing modes to define scan aggressiveness on a scale of 1-5, with 5 being the most aggressive |
-v and -vv | Verbose and very verbose output for additional details |
-p | Select specific ports to scan for, such as -p 22 to look for SSH |
--top-ports | Scan for the most common ports, a compromise between speed and accuracy |
-A | Aggressively query for OS, versions and other details. |
Understand Scan Results
The above scans will return information about the status of the hosts and the ports scanned. There are three main results to understand.
- Open: An application is listening for inbound connections on this port
- Filtered: A firewall is blocking the port, preventing Nmap from reporting the port's status as either open or closed
- Closed: No application is listening for inbound connections (however, the port could open as applications or services start)
Other results are possible, but these three are the most likely.
A Few Advanced Examples
The documentation on the Nmap site is very complete and offers many advanced scanning examples that combine multiple options. Consider the following example from the site:
# nmap -p0- -v -A -T4 scanme.nmap.org
Here is a breakdown of the four flags:
- -p0-: Scans every TCP port
- -v: Calls for verbose output
- -A: Adds OS identification, service enumeration and it enables the scripting engine
- -T4: Speeds up the scan with an aggressive timing setting
Another more advanced tactic is managing Nmap's output, especially from the command line. Nmap offers two helpful options for managing results. The first generates XML-based output, and the second creates searchable data.
By adding the -oX option to your Nmap search, you can generate an XML-based text file that you can then convert to HTML, which is useful when displaying results to non-technical folks who need a more user-friendly way of understanding what Nmap discovers.
$ nmap 10.1.0.2 -oX hostscan.xml
$ xsltproc hostscan.xml -o hostscan.html
These two commands generate the XML file and then use xsltproc to convert it to HTML. You may not need to convert the file - programs such as Microsoft Excel and LibreOffice Calc can read XML files.
Linux and macOS users will already be familiar with the grep pattern matcher. You can write Nmap results to a text file that grep can easily search by using the -oG flag.
$ nmap -oG 10.1.0.0/24 host.txt
Use standard grep pattern matching options to find the information you need. For example, to grep for all hosts reporting port 22 (SSH), type:
$ grep -i 22 host.txt
Using Zenmap
Many security administrators prefer to use the Zenmap graphical front-end for Nmap. It's very customizable, and the results are easy to read and record. I find the visual aspects helpful for understanding the network nodes and their relationships to each other
You will see an empty interface when you first launch Zenmap. Type in the scan target's hostname or IP address, choose the level of detail from the Profile pulldown menu, and select Scan.
One of the best features of the interface is that it shows the command-line command and options for the scan type you've selected. You can also customize the scan, just like if you were at the CLI.
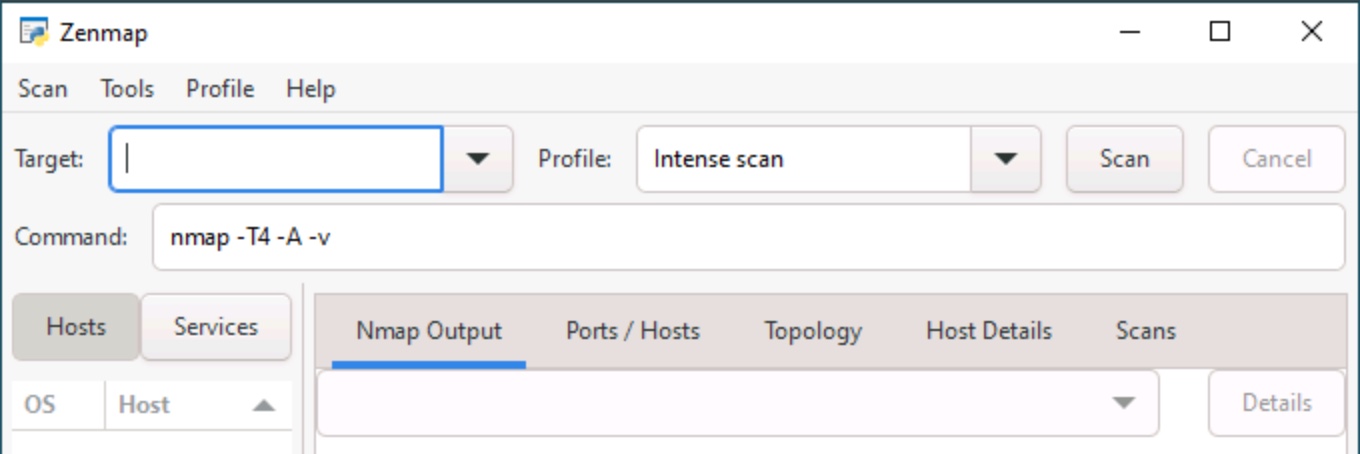
Figure 8: The Zenmap interface, including target, profile and command information
Once the scan completes (look for the Nmap done message at the bottom of the output), you can select specific hosts in the pane on the left (Hosts) and see details in the right-hand pane. You also have five available tabs that provide additional detail.
.jpg)
Figure 9: Discovered hosts
The tabs are:
- Nmap Output: Focuses on the scan results for the selected target device
- Ports/Hosts: Displays the status of ports for the selected target device
- Topology: Displays the relationship between the selected target device and other detected devices
- Host Details: Provides details on the selected target device
- Scans: Records recent scan settings for future use
All five tabs provide useful information, but I tend to spend most of my time in the first three windows. Here are some additional details on these interfaces.
Nmap Output
Once you select a discovered host, this tab displays the Nmap results for that device. Results for other hosts are still visible, however. Below, you will see the specific results for the 10.1.16.12 device in this scan:

Figure 10: The Nmap Output results
Ports/Hosts
This tab shows the ports for the selected host. Notice port 22/tcp (SSH) is open in this screenshot. The same information was available in the Nmap Output tab.

Figure 11: The Ports/Hosts tab showing port status
Topology
This tab centers the selected host and then shows the relationship in a number of hops between the host and the remaining devices discovered on the network. This view can be handy for gaining a complete picture of the environment. Various controls exist to change the scale and perspective of the map.
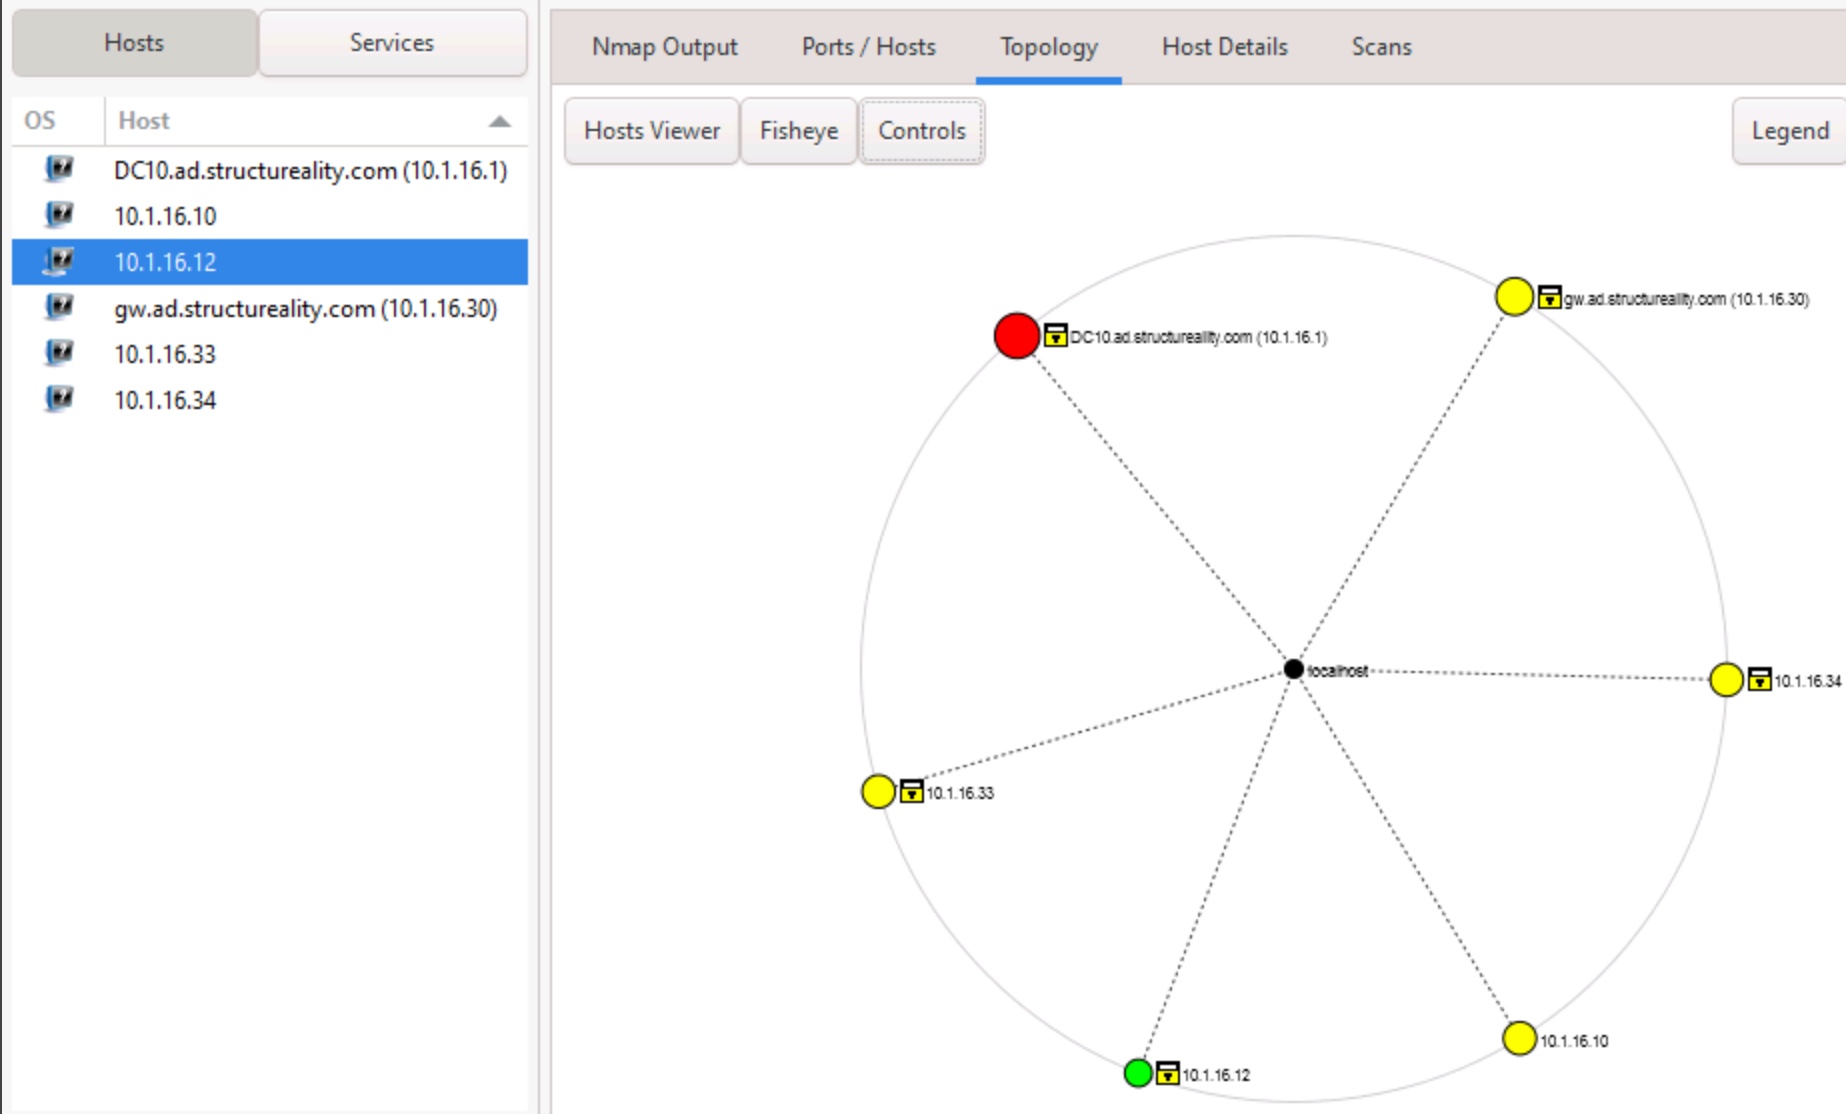
Figure 12: The Topology table displays a highly customizable network map centered on the target host
Host Details
The selected host's details appear in this tab, summarizing ports, IP address, MAC address and other information.
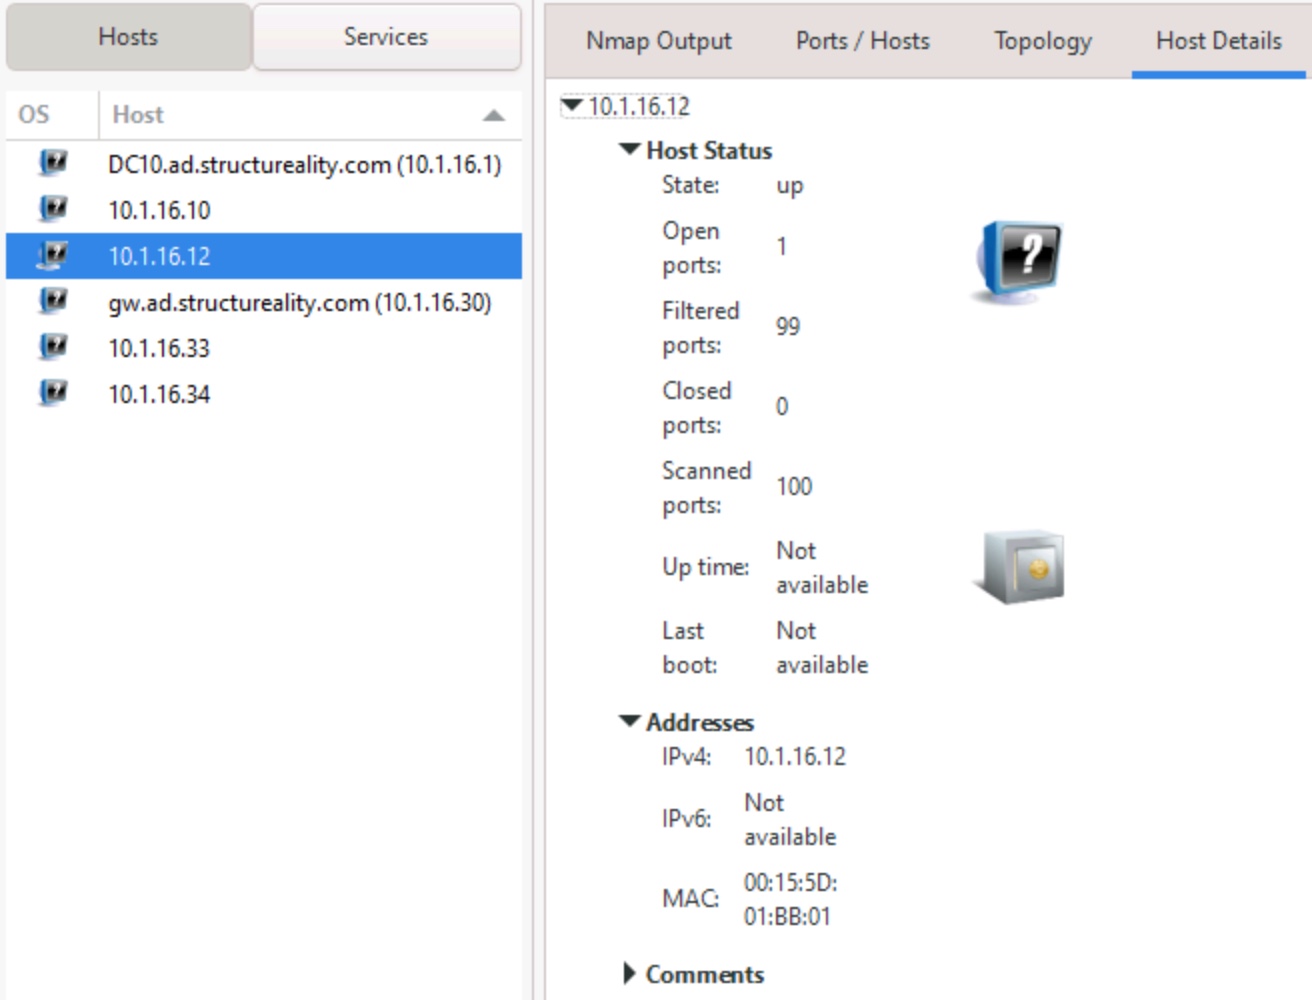
Figure 13: The Host Details tab displays specific information about the selected host
Common Misconceptions
Don't assume Nmap is just for security professionals conducting penetration testing. Any IT person—administrator, developer, auditor—can benefit from understanding the network environment in which they work. Nmap isn't just for hackers; it's a great network diagnostics tool that paints a very complete picture of network devices and services.
Another misconception is that Nmap is difficult to use. While remembering the many options is challenging, most scans are basic, and there are plenty of reference materials. The Zenmap front-end makes Nmap very user-friendly. The ability to run Nmap on Linux, macOS and Windows is a huge benefit in today's multiplatform world.
What about legality and company policies? I've taken pains to demonstrate that Nmap doesn't have to be a security or hacker tool, but it's usually perceived as a utility malicious actors use. As such, intrusion detection systems (IDS) often detect it. Be absolutely certain you have authorization before running any security tools in a business environment.
Not Just a Security Tool
Nmap is one of the first utilities IT professionals learn about and reach for when exploring and understanding a network. It is indispensable for discovering hosts (known and unknown) and identifying the roles held by network nodes. It's a great a security tool, but it also provides plenty of utility for troubleshooting, analysis and network monitoring. Be sure you have permission before you run Nmap outside of a lab environment. And for fun, watch for Nmap in some of your favorite movies, including The Matrix Reloaded, Ocean's 8, Snowden and more.
Learn the skills you need with CompTIA CertMaster Learn. Sign up today for a free trial today!

